

Technical Articles · Windshield Coating & Validation
A formed windshield needs to be checked in the condition the customer will receive. Shape, local thickness, viewing quality, coating condition and assembly fit each provide part of the evidence for sample approval. Start by defining the sample, the critical areas and the requirements it must meet.
In this guide
This guide focuses on formed plastic windshields with functional coatings. Bring the drawing or reference, intended application and any required specification into the review. PlsTect can help connect the coating and forming route with the checks needed for the proposed component.
1. Define the sample and inspection stage
Assign the sample an ID and drawing revision. Record its material grade, starting thickness, tint, coating configuration and completed operations. A formed substrate awaiting coating and a finished coated part need different inspection records.
| Route | Inspection stages to identify |
|---|---|
| Thermoformable pre-coated sheet (TAS), then forming | Check the coated part after forming and cooling, then check the delivered condition after trimming, holes and other agreed finishing. This route does not add a coating cure after forming. |
| Form first, coat afterwards | Check the formed substrate before coating. Inspect the finished surface after the specified coating process, including its required cure, and any remaining finishing operations. |
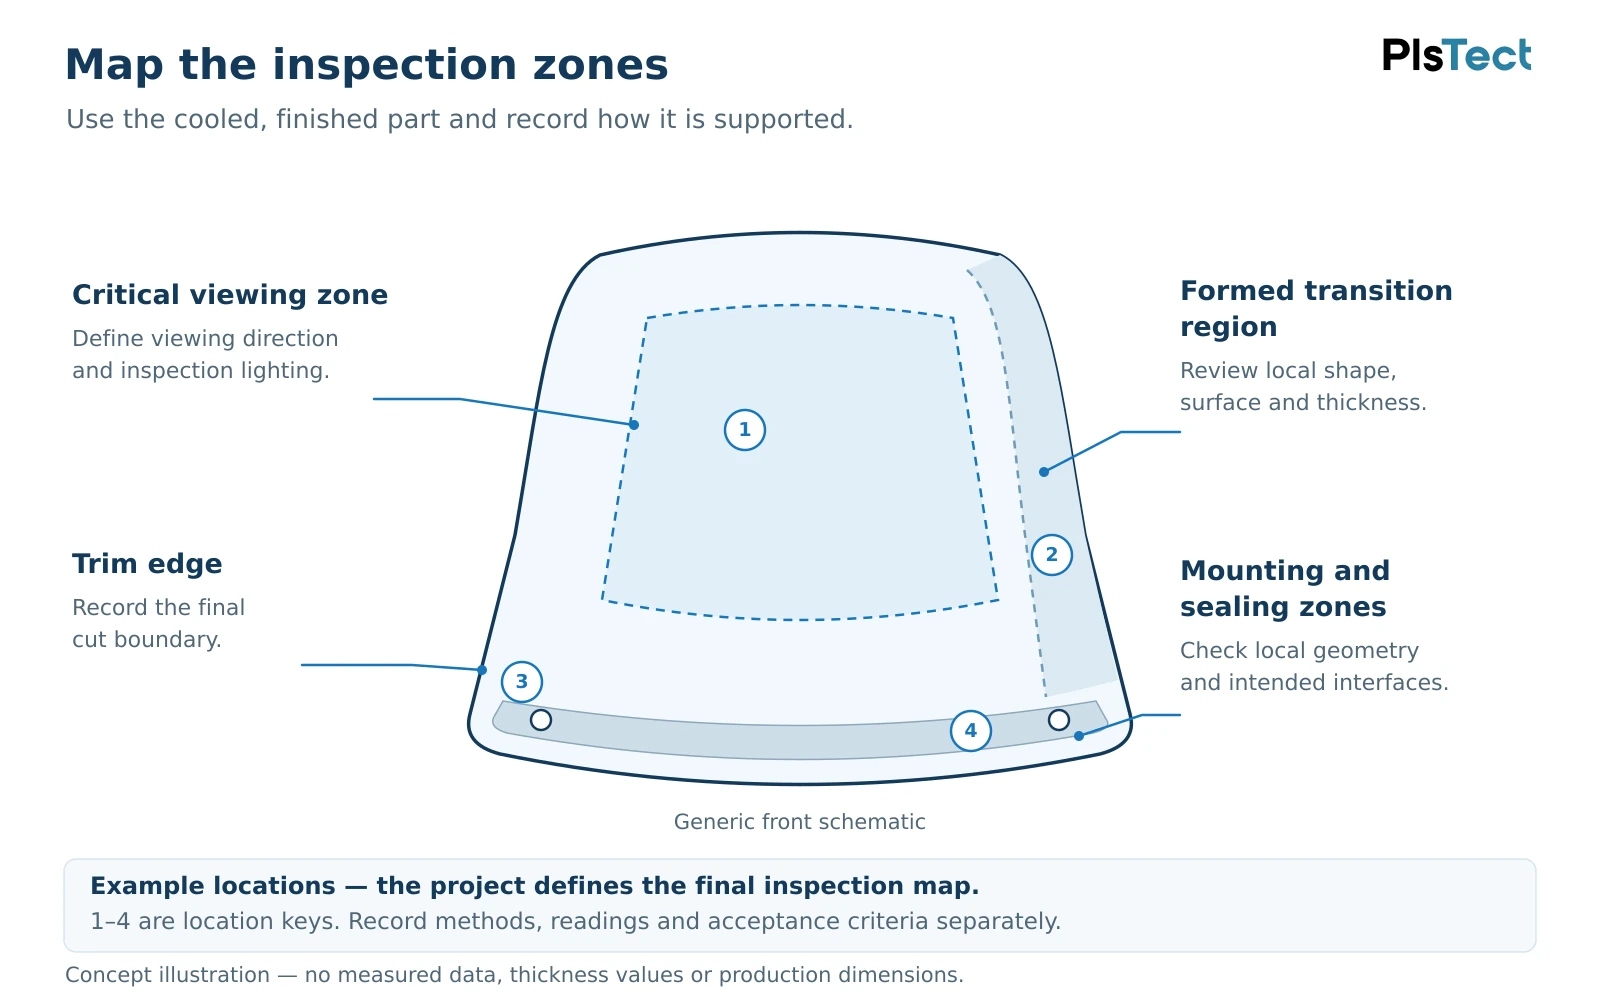
Mark the critical viewing area, mounting and sealing zones, and any intentionally uncoated or printed areas. Confirm the reference, measurement conditions and acceptance criteria before judging the sample. Unresolved requirements should stay visible in the review record.
To compare the manufacturing routes before defining the validation plan, see pre-coated versus post-form hard coating for windshields.
2. Map geometry and local thickness
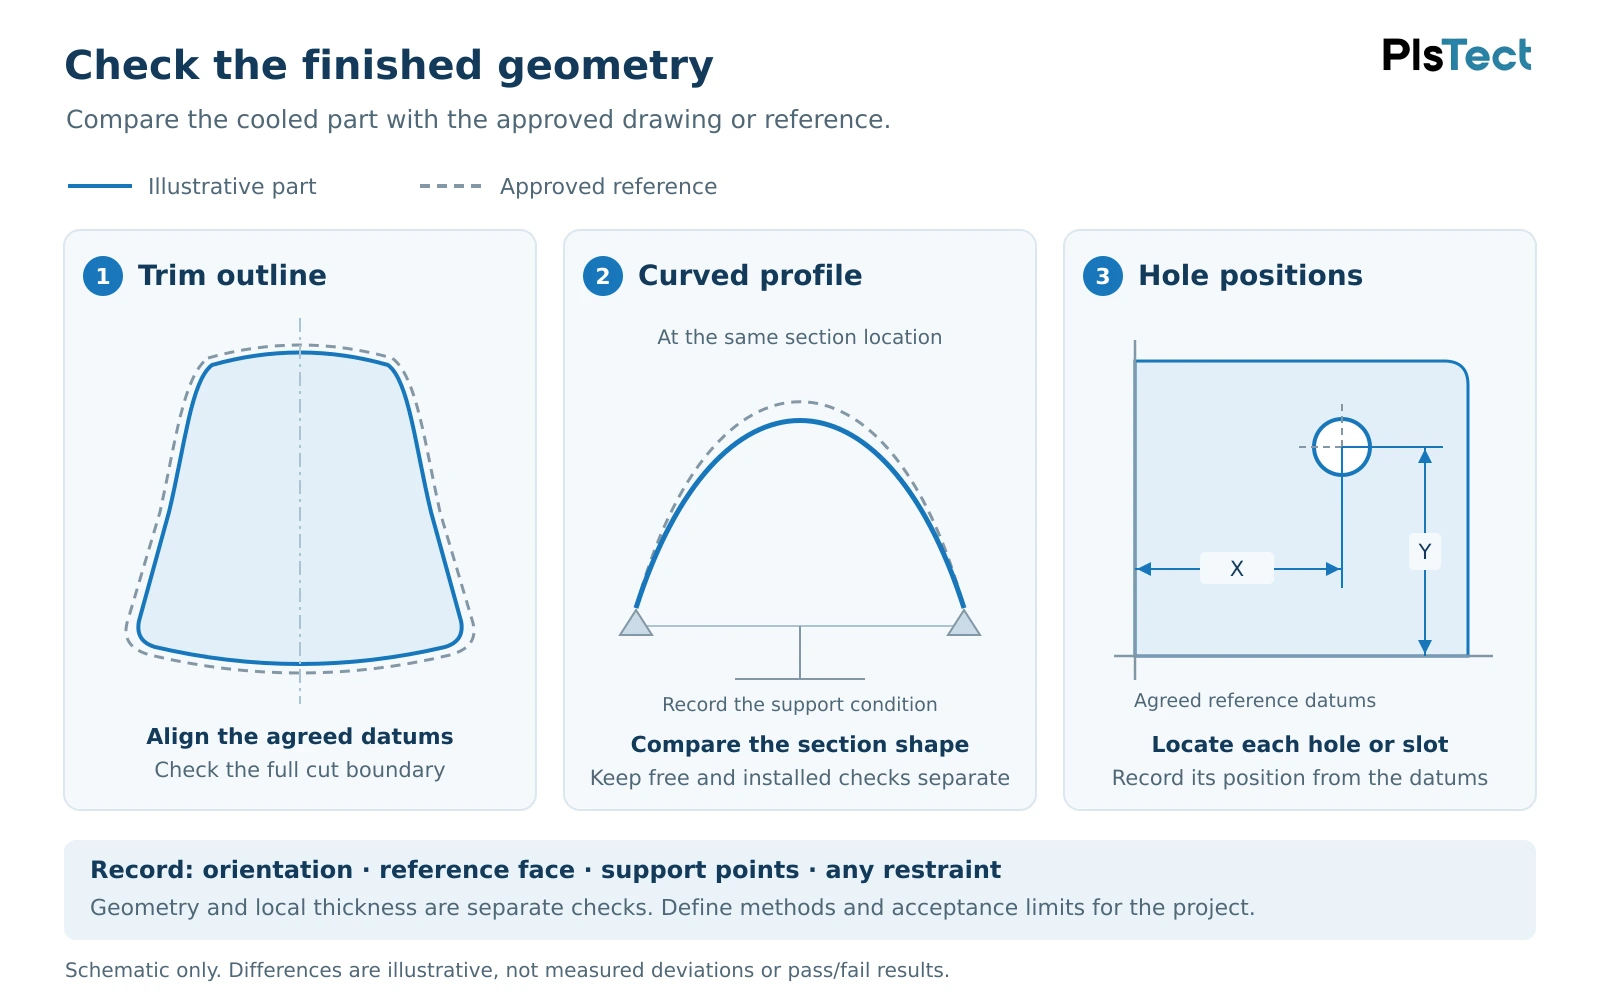
Compare the cooled, finished part with the approved geometry using a suitable measurement method or fixture. Record its orientation, reference face, support points and any applied restraint. Where installation bends the part, record the free and installed conditions separately.
Include the overall profile, curved sections, trim edge, holes, slots and mating surfaces. Use the flat and curved window measurement guide if the geometry reference still needs clarification.
Measure local thickness as a separate item. Plaskolite’s TUFFAK fabrication guidance identifies material distribution, thin corners in deep draws and distortion after mould removal as forming concerns. The starting sheet thickness alone therefore cannot describe every finished location. [1]
Give each measurement position an ID. Include the viewing zone, formed transitions, areas expected to stretch and mounting or sealing regions where thickness matters. Record the method, units and readings against the agreed limits. Select a method suitable for the local curvature and access.
3. Check viewing quality and the coated surface
Inspect both faces under repeatable lighting. Locate scratches, tool impressions, bubbles, wrinkles, cloudy areas or other visible changes on the inspection map. Keep the observation separate from the proposed cause until it has been investigated.
Review the part in its intended viewing orientation, including the important operator positions and oblique views. Keep the target, lighting and observer or camera position consistent when comparing samples. Record the setup so another reviewer can repeat it.
Haze, light transmission and image distortion describe different aspects of visibility. ASTM D1003-21 covers haze and luminous transmittance for planar material sections. Before applying it to a curved component, ask the laboratory to confirm the specimen geometry and preparation needed for a valid result. A whole-part viewing review should remain a separate record. [2]
Inspect the coating in its delivered condition
Check the required coated faces, formed transitions, edges, holes and masking boundaries. Record any cracking, peeling, local cloudiness or incomplete coverage. For pre-coated sheet, include regions affected by forming; for post-form coating, compare the actual coverage with the specified coated and uncoated areas.
Keep appearance, adhesion, hardness and abrasion results separate. A surface can look acceptable while still needing performance evaluation. Choose the required tests for the actual substrate and coating, and confirm suitable specimen preparation with the laboratory.
For example, ASTM D1044-24 evaluates a particular type of surface abrasion through the change in optical properties. Record the test method, specimen, settings and result when using such a report. Its result supports that defined abrasion evaluation; a particular wiper or cleaning service needs its own assessment. [3]
4. Connect test specimens to the finished part
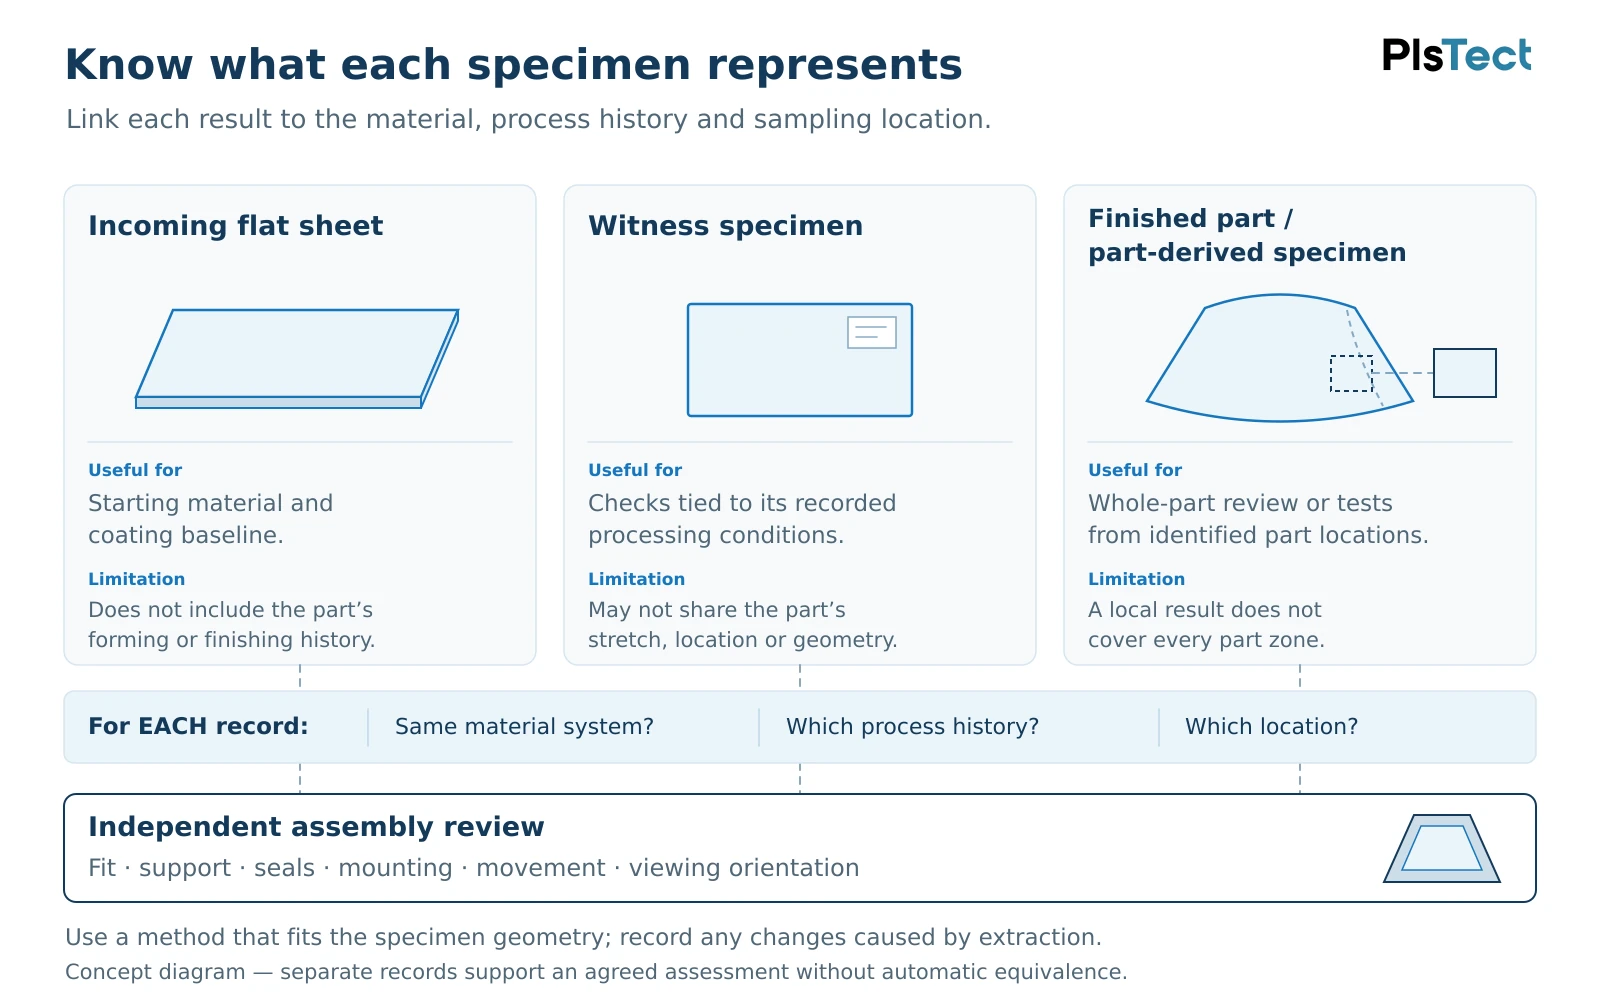
Identify what was actually tested. The following evidence can support different parts of the review:
| Sample used | What to establish |
|---|---|
| Incoming flat sheet | The starting material and surface baseline, with the grade, thickness, coating and batch identified. |
| Separate witness specimen | Which coating or processing conditions it shared with the part, and which forming history or local deformation it did not experience. |
| Finished part or specimen taken from it | The sampled location and process history, whether the test method accepts that geometry, and any changes caused by cutting or preparation. |
Trace the evidence through three questions: Which material system? Which process history? Which part location? A separately coated flat specimen can help evaluate a coating process, while leaving the behaviour of a stretched or curved region unresolved.
Keep whole-part geometry, viewing and assembly checks alongside the laboratory results. Allocate extra parts for destructive work where required. Cutting, flattening or otherwise changing a sample must be agreed and recorded because the resulting specimen may no longer represent the original condition.
5. Review the installed assembly and use conditions
Use the intended frame, supports, seals, fasteners or bonding system for the fit review. Record clearances, contact areas, retention, seal condition and viewing quality after mounting. For a material change, the glass-to-polycarbonate replacement guide connects these checks with thickness, movement and the surrounding assembly.
Choose service evaluations from the actual application:
- Wiping and cleaning: identify the blade or cloth, fluid, contaminants, contact conditions and procedure.
- Outdoor use: identify the exposure conditions and the optical, colour, surface or mechanical changes to assess.
- Sealing and mounting: define relevant water exposure, temperature, vibration or other operating conditions.
The guide to UV blocking versus weathering explains why initial transmission data and retained performance after exposure need separate consideration. Record before-and-after observations and the agreed acceptance criteria for each selected evaluation.
Where an application requires a specified approval or protective function, identify it at the start and involve the responsible designer or testing specialist. A bench fit check covers only the conditions actually assessed.
6. Record approval and the remaining actions
Keep the following information with the sample review:
| Record | Minimum useful detail |
|---|---|
| Identity and stage | Sample ID, drawing revision, material/coating batch and completed operations. |
| Requirement and method | Property or dimension, location, setup, test method and acceptance basis. |
| Evidence | Readings, photographs, report and specimen IDs, with the conditions recorded. |
| Decision and follow-up | Accepted scope, open items, responsible reviewer and the revision approved for production. |
For example, if fit is accepted while abrasion testing remains open, record those decisions separately. Keep the retained reference sample and written requirements together. Before production, define which checks will be repeated and how production samples will be selected.
What to send for the first review
- A drawing, sample or available geometry reference, with critical viewing and mounting areas marked.
- The material, starting thickness, coating route and current sample stage.
- Existing measurements, photographs or reports, with the tested specimen identified.
- The intended cleaning, wiping, outdoor and installation conditions.
- Required specifications, known acceptance criteria and the questions still unresolved.
Start with the information already available and mark the gaps. PlsTect’s Quality Proofing support can help organise the relevant validation questions and documentation for the project.
Frequently asked questions
If the windshield fits the mould, is the sample ready for approval?
Check the cooled and finished geometry, local thickness, viewing quality, coating and intended assembly against the project requirements. The condition on the mould is only one stage.
Can an existing flat-sheet report be used?
Yes, when its material and test scope are relevant. Record what it establishes about the starting material and what remains to be checked on the formed component.
Is there one acceptance limit for every windshield?
The applicable specification and project requirements determine the criteria. State the limits, methods and approval responsibility before the sample is evaluated.
Further Reading
- Plaskolite — TUFFAK Polycarbonate Sheet Fabrication Guide, thermoforming and troubleshooting sections. Product guidance on forming, material distribution and shape changes.
- ASTM D1003-21 — Haze and Luminous Transmittance of Transparent Plastics. Public scope and significance summary; confirm specimen suitability and the applicable test procedure with the laboratory.
- ASTM D1044-24 — Resistance of Transparent Plastics to Surface Abrasion by the Taber Abraser. Public scope and significance summary for a defined abrasion evaluation.
Plan validation for your windshield project
Share the reference, material and coating route, sample stage, and the performance you need to verify. PlsTect can help review the supply route and the information needed before sample approval.